THE HISTORY OF THE JC MIDGE (by JC)
By 1984 the Moss motor co., now renamed Moss Sports Cars Ltd, had, in just 3 years, in terms of sales volume, become the 4th largest kit car company in the UK,excluding of course semi production kit manufacturers such as Caterham cars.
We had recently moved to a 4500 sq. foot unit with workshops, offices and a large showroom where examples of the Moss Roadster, Malvern,Monaco and Mamba were kept on display.
Customers collecting kits were free to look around and browse the showroom.
On one occasion a customer who had come to collect a Roadster body kit arrived in a hired Transit van with a friend who had come along for the ride, and to help with the loading.
While the customer was in the office sorting the paperwork I struck up a conversation with his companion who was admiring the cars on display.
'Do you fancy building one as well?' I asked.
'Love to', he replied 'but my finances only stretch to an old Ford Cortina and a big mortgage and if I started it I probably couldn't afford to finish it! ( A Malvern or Roadster at that time probably cost around £3000 to complete.)
That got me thinking about how a car could be put together more economically.
Clearly the biggest expense was the body kit itself. The average Moss kit was around £850, so by the time you had added the donor car, the seats, upholstery, lights, sport steering wheel, alloys, tyres replacement period lights etc etc, even without the weather gear you wouldn't have any change out of £2000 however much you economised.
I envisaged that a period design of classic car with no compound curves could be made using plywood and aluminium and had already seen a set of Haydn Davies' plans for the Burlington which was constructed in this way. A friend had purchased them and did not feel confident to embark on the project because in his own words, 'they were 80 pages of hieroglyphics!' by which he meant photo-copied pages of hand written notes and construction sketches with no stage assembly pictures or, as I recall not even a picture of a finished car. Everything seemed to be left to your imagination and even I felt that they were too hard to follow. I know that quite a few cars were made and I had a lot of admiration for Haydn and his ingenious designs (And still do) but when I looked at these plans, even I felt that despite my own design experience, I would have trouble interpreting them.
So the idea was good.. but how do you improve it and simplify it so that even the most inexperienced amateur could understand and work with the plans.
What it needs, I thought, was a 'picture on the box' i.e. When you buy a construction model you always have the picture on the box to refer to as the build progresses.
This train of thought led me to recall the old Keil-Kraft balsa wood model aircraft where the plans were simply small paper patterns that you stuck onto bare sheets of balsa wood and cut out the shapes with a modelling knife.
That was really the eureka moment....
Why not make use of full size paper patterns to cut out all the plywood panels just like a large model kit, with instructions on the sheets together with drawings/ pictures of each stage of assembly plus accompanying photographs of a finished car so even the most inexperienced builder could at least see what he was aiming for and how to get there!
The Triumph Herald was the obvious donor choice as I was completely familiar with all aspects of it's construction, body removal and running gear as we were working with these cars on a daily basis.
So I found myself a decent enough Herald donor for £50, stripped it down to a rolling chassis and took it home so I could work on it there where I could concentrate with a train of thought uninterrupted by all the daily mayhem that was Moss!
The first hurdle to be crossed was the design concept. The car had by definition to be vintage because a plywood construction meant no compound curves. Also no GRP wings because of the expense as I wanted the car to be able to be constructed on a shoe string budget where the builder could make everything himself without recourse to us unless he could afford, or preferred to buy our parts.
I had never favoured copying other designs and although the Moss roadster and Malvern took a tilt at Morgan they were never intended as copies despite their Morganesque design they were entirely my own concept of the car that never was. A sort of Morgan 4/4 -MG TF hybrid.
My knowledge and ownership of pre war MG's took me back to the MG J2, a design I had long admired but an example of which I had never owned.
I did aspire to a 1939 TA and a 1931 MG1880 which I cannibalised brutally (but that's another story!) and a friend owned a very rare KA Magnette but the nearest we ever got to a J2 was a 1960 local newspaper advert offering one for sale for £15. We were invited for a viewing and found it in a very sorry state, residing in a paddock on four bald perished flat tyres,with a tattered hood, no side-screens and chickens living in it, which to be fair had not done much for the upholstery.
£15! and we turned it down! If only we had known then what we know now!
Anyway I studied many photo's of J2's and concluded that this was definitely vintage motoring at it's simplest.
I set out therefore to replicate 'the look' as closely as possible.
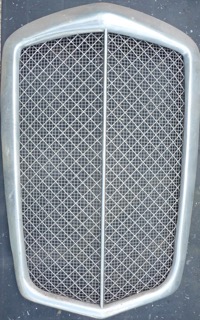
MG radiator grilles were,as now, in short supply but I found a period slatted Wolseley grill that kind of looked right. Realising that these would not be readily available I took steps to have that original grille made into a pattern from which the future grille surrounds could be cast. The slats could not be cast, but the early works MG'S had a a honeycomb radiator with a single centre slat and I knew that look would be easy to achieve.
With the radiator grille in place I could now work out the rest of the car. This was because the radiator grille dictates the height of the bonnet and hence the dashboard and so on working backwards.
There is a certain fibre board material used for pinboards that is a cross between chipboard and cardboard. It is about a half inch thick and very easy to cut.
I purchased a couple of sheets of this together with some wooden block and commenced to mock up a body tub on the Herald chassis. The procedure was to cut a piece of this fibreboard down to size, stand it on the chassis and, using a marker pen, literally draw the shape of the body including the doors onto it. The doors were not cut out only drawn . When the outline looked right I would cut the panel to that shape and move on to the next bit. The floor, the back panel the higher section over the rear suspension and even the engine side panels were all sculpted in this way. Just a big mock up, virtually made out of cardboard!
Luckily it didn't rain, because I had decided that my domestic garage was way too small for this project as I continually needed to stand back and look at the design from a distance to get the 'look' just right.
So the Midge was born outside in the fresh air on my drive, where my faithful cross labrador laid patiently on a car trailer watching every move and never budging from his new found observation platform. When I was satisfied with the general outline that had been hacked out, this was then permanently replicated onto 3/4" exterior plywood and the bare body was constructed, screwed but not glued so that it could be dismantled in order to make paper patterns of each panel later.
The shapes of the bonnet side were transferred onto 18swg aluminium and cut out and louvred. . A GRP replacement 'roller coaster' ( I coined that expression) dash top was acquired, narrowed and re-moulded to provide a means of supplying the only part that could not be replicated in wood or aluminium!
The dummy petrol tank had to be large enough to contain a real fuel tank in it's lower half. ( Notably a Mini van or Capri tank, or sometimes Spitfire)
It's construction baffled me for a while until I figured that a sheet of aluminium could be rolled around two shaped plywood end pieces and the petrol filler pipe could be extended from the enclosed tank to a top mounted filler cap.
The bonnet top panels were first mocked up from large pieces of stiff cardboard with hand rolled edges,taped between the dash-top and the radiator grille, before being immortalised on paper and created from aluminium sheet. The aluminium versions were a bit too hard to roll by hand and the nearest lamp post was pressed into service as a forming jig! As it was perfectly round and very close to a wall. the bonnet sections, protected by film, could be pushed between the lamp post and the wall and simply pulled around it to create the required bend!
The small apron in front of the radiator was also first modelled in cardboard. Until I actually made one I had no idea how to accomplish the correct look. Louvres in the final aluminium version added some authentic style.
I seem to remember that the seats were taken from a Reliant Robin, the first windscreen was just aluminium channel glazed with perspex!, the wiper system was Spitfire, the door locks were Mk1 Mini and just about everything else came from the donor car. i.e. seat-belts. wiring loom, instruments etc. The gearbox neck was cut in two and extend with a short section of 2 inch square steel box section bolted inside both cut sections,and the the operating rod between gear lever and gearbox cut, tubed and welded to the new length.
Steel trailer mudguards were obtained and simple brackets and wing stays made to mount them back and front with the addition of some cross bracing to stiffen the front bracketry.
Although the Triumph wheels were fitted with oversize 'tall' tyres, they still lacked diameter so having the mudguards mounted high gave the visual effect of the wheels being bigger than they actually were in order to add authenticity to the overall look of the car for those who may not be able to afford expensive wheel conversions.
The idea of having the front mudguards turning with the steering was definitely out for two reasons. Firstly that design requires that the mudguards have to sit low down and close to the tyres. This destroys the tall wheel image and also invites trouble. Brackets mounted to the backplates, although kept short to reduce unsprung weight are subject to subtle vibrations that can cause stress fractures at their root without warning, as I discovered when on a previous 'special' a front mudguard came adrift at 80mph and wrapped around the front wheel locking that side up completely! Not good for the tyres or the health! (or the nerves)
The whole car was designed as budget build and without any weather equipment it was perfectly possible to construct a finished Midge, including the donor car for £500 on the road. Obviously this did not include the cost of road tax or insurance but was a sub total of all the parts and simple raw materials used in it's construction. Namely, from memory 3 sheets of plywood and a similar number of sheets of aluminium.
The finished car was now taken apart and the panels, shape now proved, were literally drawn around onto sheets of paper.
These outlines were then cleaned up and made symmetrical before being professionally drawn and overwritten with the positioning of the connecting wooden blocks and the assembly instructions.
The body was then re-assembled, this time screwed and glued before being skinned with 26 gauge aluminium sheet
The whole project was completed outdoors, as a complete bare aluminium skinned roadworthy car, including drawing the patterns and writing the instructions in 3 months start to finish.
It was later fitted with the first of the production windscreens. . I designed a hood and frame together with side-screens and an optional tonneau cover.
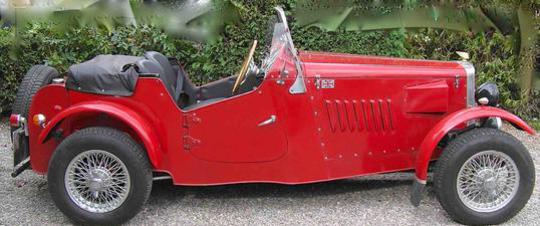
All my previous designs, after the Roadster, began with the letter 'M' and just leaving the 'T' off the end of the MG 'Midget' left us with the name 'Midge' which I thought kind of suited a little buzzy flying machine for crazies on a budget. So that was it. The JC Midge.
A shorter bodied version was added to the design to suit the shorter Spitfire chassis, and where previously the straight six of the Vitesse could not be accommodated under the bonnet the shorter body tub designed for the Spitfire chassis could now be mounted onto a Vitesse chassis and simply fitted with extended bonnet panels in order to encompass that longer straight six engine.
These modifications were incorporated into the pattern sets and instructions to allow an extended choice of donor car.
We were selling 20 to 30 sets of patterns per week at £30 a time and by the time the Moss production unit was destroyed by fire a few months later,JC Autopatterns (Later JC sportscars then sold on to become T&J Sportscars later re-sold to White Rose vehicles) had accumulated a considerable amount of money in the bank which, against professional advice I promptly wasted trying to rescue Moss by having the moulds and patterns re-made at my own expense.
The original car which was finished in bare aluminium and sported the multi-slatted Wolseley radiator grille was intended to portray the cheapest build in that it did not need to be painted if the budget did not allow it. To show the other end of the spectrum, it was later sprayed radiant red and fitted with the polished aluminium radiator surround complete with centre slat and mock honeycomb mesh as per the racing Midgets. The weather gear was developed and fitted and made available as an optional extra. After T&J took over production the car was stripped for a re-paint and fitted with a tan hood which I though was not 'period enough' and the radiator was fitted with bright silver mesh and no centre slat, which again took away the authenticity.
Footnote.
At that time, when the kit car magazine press was trying to raise the bar and present the kit car industry as an increasingly professional body of manufacturers intent on coming in line with the reliability and quality of production cars, only the more expensive up market kits were being featured and promoted, and the ' Wooden wonder', as someone dubbed the Midge, was regularly slated, as was the unconventional and slightly outrageous Moss Monaco which was even ridiculed by at least one magazine as 'looking like a boiler on wheels complete with rivets!'
Interestingly, whilst that magazine no longer exists, both the Midge and the Monaco now command increasingly high prices and are much sought after as classics in their own right.
I rest my case!
John Cowperthwaite (designer; JC Midge)


MOBC Mk1 and Mk2 Midge Owners' and Builders' Club
Although the Mk1 Midge is no longer being built because of changes to the law, there are still plans available for re-re-bodying and repair. If you want one and can't get one, how about a Mk2? The Mk2 gets away from the legal problems as the chassis is not adjusted. And you can make your own variation on a theme - it is generally recognised that no two Midges are identical -